Classic Salmon and Trout Flies
of Europe and the Americas |
 |
I thought it would be fun to show what goes into tying one of the more complicated wet flies. This is something of an "introductory" complicated fly, featuring a married wing and tail, but not as difficult as some others. I've used a Mustad 3399 #6 hook for this fly, and Benecchi 12/0 thread. Danville's Flymaster 6/0 is also a good thread for these flies, as it can be flattened.
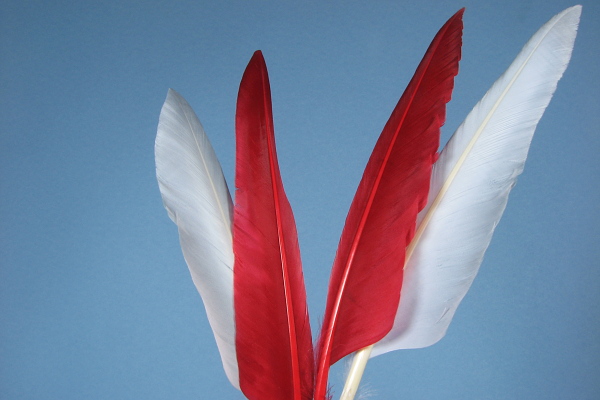
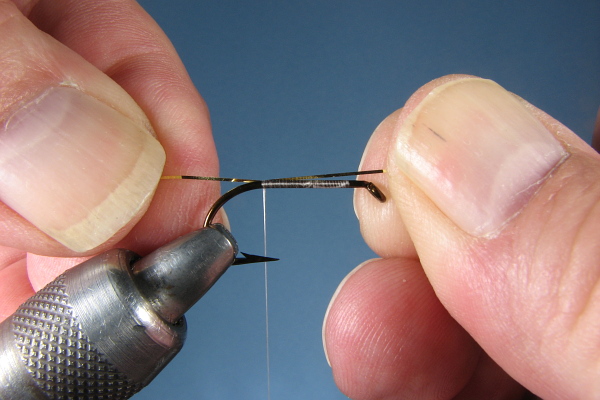
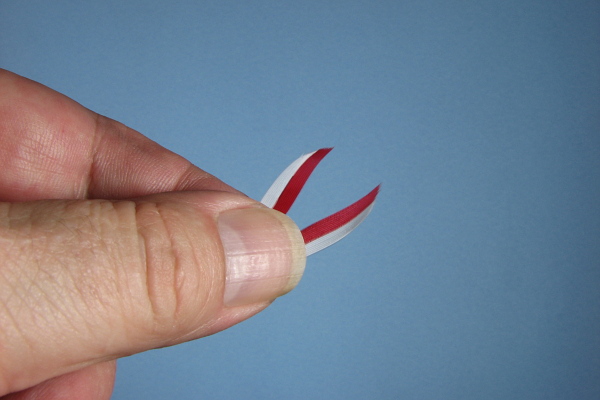
1. I've selected some dyed duck feathers that will make up the tail and wings. I will take slips from the two on the left to make up the far side of the tail and wing, and slips from the feathers on the right to make up the near side of the tail and wing. This will result in a tips-together fly, meaning the tips of the wings and tails sections will meet when tied on. The two feathers on the left I refer to as "lefts" because the sections from which we will cut slips are on the left side, relative to the stem. The two feathers on the right therefore will be termed "rights" for the purposes of this discussion.
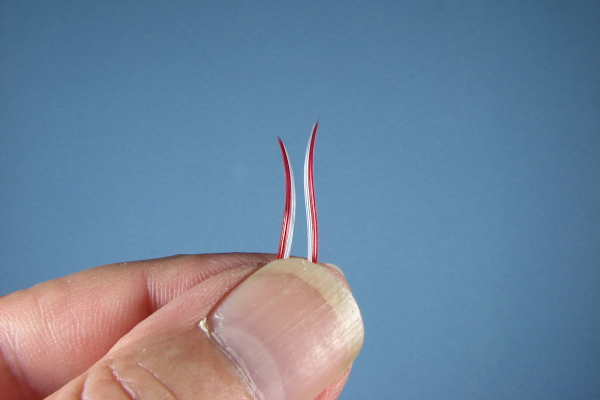
2. In this picture I show two sides of a tail I've created. The side shown on the left was made from slips cut from my "lefts". This will make up the far side of the tail, with the white on the bottom. The side shown on the right, made up of slips cut from my "rights", will make up the near side of the tail, white on the bottom. Though each slip shown is only two strands wide, I started with wider slips, married them, then stripped off everything but the two strands of white and two of red. Two strands can be married to two strands, but why make things difficult?
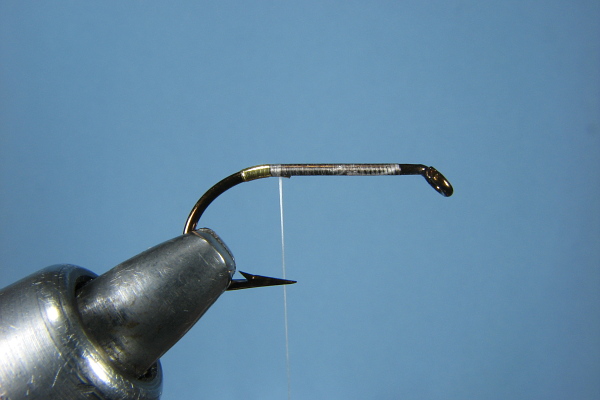
3. Here I've wound a thread base to the start of the bend and am attaching the tinsel for the tip on the far side of the hook. I like to attach all my materials this way, and I learned this from Don Bastian, the great Pennsylvanian exponent of these flies. The beauty of this is that when the materials are wound, they will get pulled down to the bottom, which is really where you want them to start. If you want a gold tip, put the gold side of the tinsel toward the hook shank. This is counterintuitive, but it works.
4. I hold the tinsel in place with five thread wraps forward. Then, I wrap the tinsel back down the bend five wraps, then back forward over itself five wraps. I use magnification to get this just right. I then unwrap the thread five wraps and catch the two ends of the tinsel with a wrap foreward. Two more wraps forward, and I cut the tinsel. The results are the tip shown above. I know this seems like a lot of counting. I count everything, sometimes aloud. It breeds consistency.
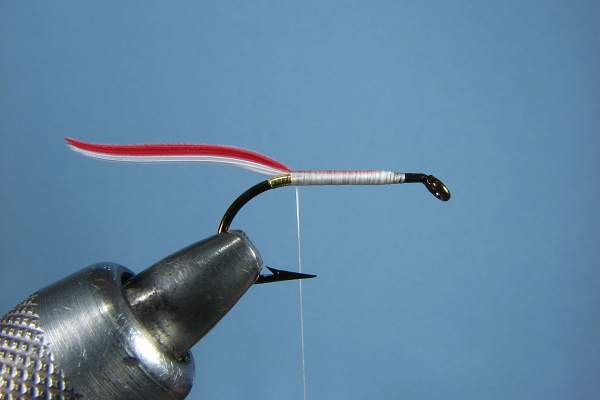
5. Between every stage I wind the thread forward to somewhere short of the eye, and back, always cognizant of building a taper and evening things up. I spin the bobbin counterclockwise as necessary to flatten the thread. I've attached the tail here, and this can be somewhat problematical, especially if you've taken slips from low on the feather. Every feather has a sweet spot toward the middle, but I took these from lower down, where the feather exhibits a lot of curve. It makes putting the sides of the tail together more difficult, but on the other hand, you get a nice curvature in the tail that I like too. The tail should form a bit of a tent but be very much on the top of the hook, not straddling the sides. You must do all you can to get the tail straight up and down, by checking the top before you secure everything. I like to straddle the hook with the butts, do a couple of soft loops, then pull everything up on top with the right hand on the butts, left on the tail. A plain old pinch loop works too, if the feathers aren't too curved. If it just won't go, try another set of slips. Tail length is from the back of the eye to the hook bend more or less.
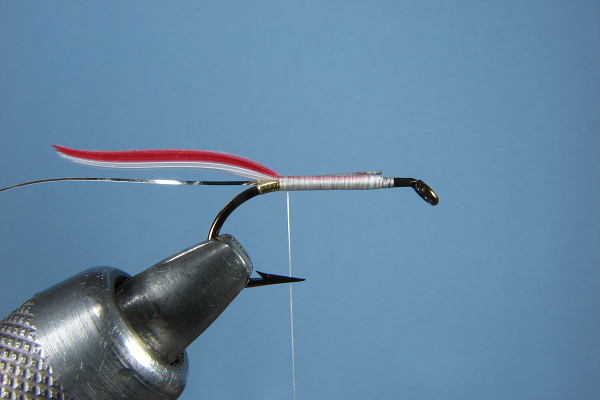
6. I attach the ribbing right in front of the tail, again on the far side of the hook, gold side toward the hook. It looks like silver is against the shank here, but it's the lighting.

7. I do floss several ways. Here I tied two strands of Danville's four strand floss just in front of the ribbing. Sometimes I'll use one strand of Lagartun. Sometimes I'll go to the front of the fly and tie in a single strand there, ultimately winding my floss to the back and then forward again. I've never settled on a method. I'm doing it this way these days.
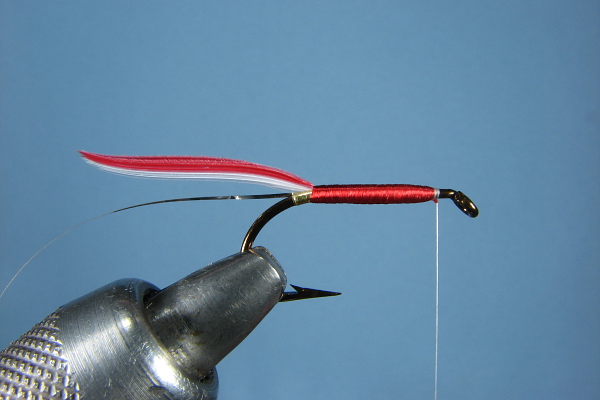
8. I always let the floss slip through my fingers as I wind. I've never had the need for special silk gloves doing it this way, nor do I manicure my hands or use hand lotion. If your hands are rough, the gloves or hand cream can help. I overlap the floss a little as I wind, and try to be very precise. If the base you started with was free of lumps, you should get a decent looking body. If it wasn't, you'll never fix it, it's too late. Go back and add thread wraps and even things out.
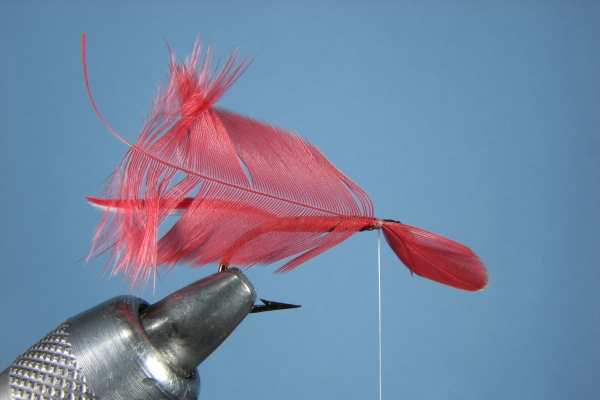
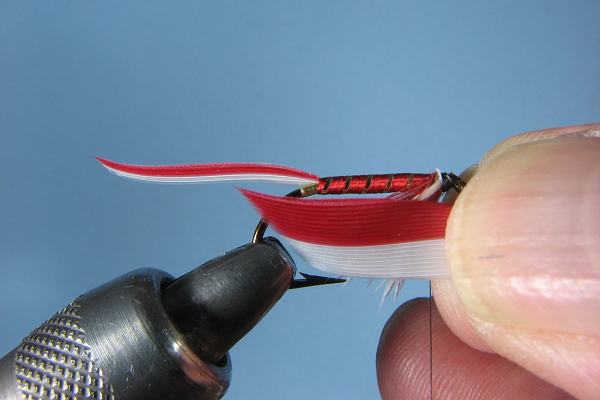
9. This is how I attach hackle for wet flies, by the tip. I've tied in the red first, as I want to wind it last, over the white. Just hold with one thread wrap.
10. The white hackle has been attached here. I've sized it so that it will just reach to the point of the hook after winding.
11. You could wind these together and I do a lot of that on dry flies. There's a lot of hackle here though, so I wound the white first. I always fold the hackle back as I wind, not before.
12. I've wound the red next, very slowly, pulling white hackle out of the way as I went. I did two wraps of each, as the hackle was dense Whiting American hen. If I were wrapping just one hackle, I'd do four wraps typically.
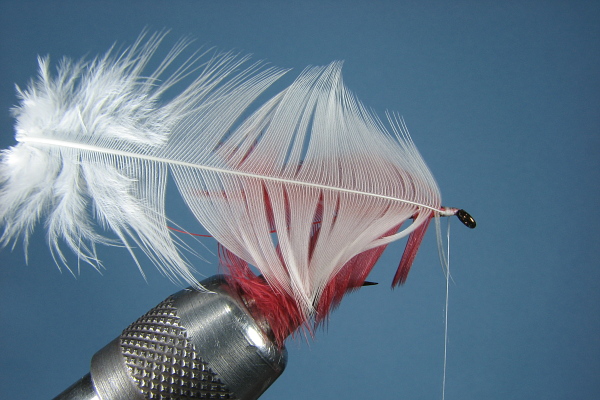
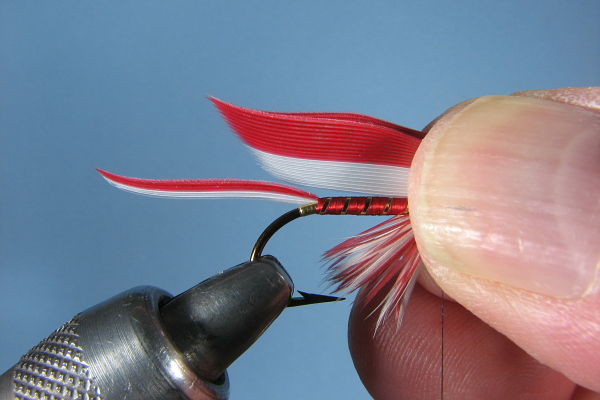
13. On some flies I'll pull the hackle down, as shown here, and take a loop around the back, then a couple of vertical winds right at the very front of the hackle. However, there are many ways to skin a cat, and one may also pluck out the fibers on top with tweezers, making room for the wing. You may simply part the hackle on top and make room, if you want a fuller look. Or, finally, you can use Don Bastian's faux hackle method detailed below. All are legitimate, and all were used by various tiers throughout history.
14. In this shot I've switched the thread to black.
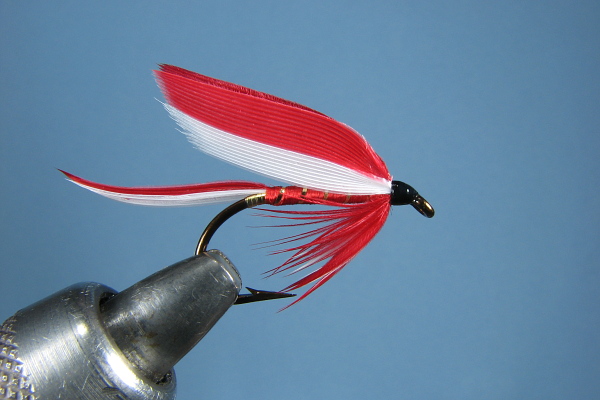
15. I've made up two wings, the near wing made up of "rights" and the far wing made up of "lefts". It's useful to point out here that lefts will never ever marry to rights and vice versa, so don't get them mixed up. Work with only one set of feathers at a time so you don't get slips confused.
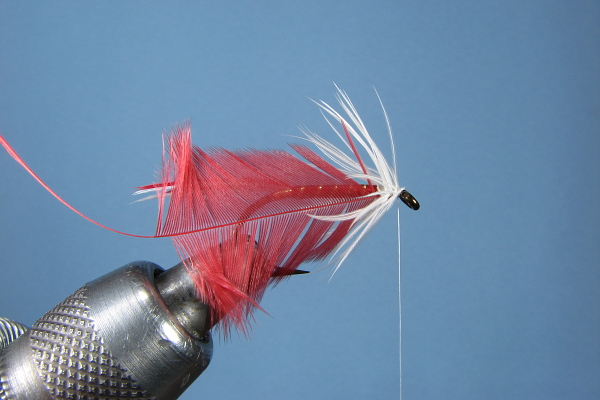
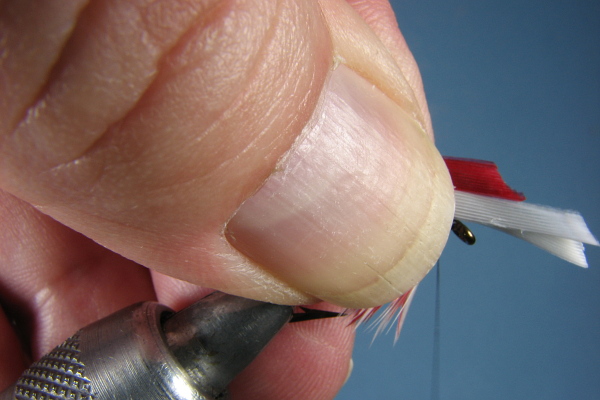
16. The wings should be anywhere from 1/2 to a whole hook gap wide.
17. I've paired the wings together here, tips together, concave sides together, and I'm measuring them to about the center of the tail. Notice that the long sides of the wings are on top. You can also do wings where the long sides are on the bottom. I've always thought of this as the Canadian style, as many Canadian wet flies are done this way. But Americans did them that way too. In the Bergman book they're all as I show here.
18. I'm gripping the wings and top of the shank, between the thumb and middle finger of my left hand. Make sure the wing is either directly on top of the hook, or slightly on the other side of the shank. Thread torque will pull the bottom of the wing toward you, and bend the top of the wing away from you. Spend a lot of time aligning the wings, getting things just right.

19. I've taken a loop around the wing here, and have created a pinch loop keeping the tension off the thread with my thumb and middle finger. I've not crushed any wing fibers yet.
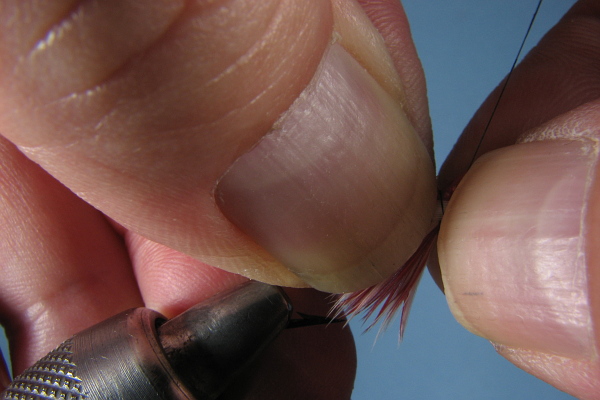
20. I've now grasped the the butts with my right hand, angling them up. This creates a nice "V" or crease for the thread to drop into. Once I get the wings exactly the way I want them I drop the bobbin by opening the pinch. Someone dubbed this the "gravity drop", which is somewhat redundant. I like to involve my right hand to hold the butts while I tighten the loop slowly upward tilting the bobbin tube using the forefinger of my right hand. Most tiers don't seem to need to do this. They hold with the left hand alone. It helps me. Whatever it takes. Again, after taking a couple of loops around, check the top of your wing and make sure it's dead straight. If it's not, aggressively change it.
21. Mounting the wing may seem like the most difficult part of doing these flies, but it's not. Nor is it the most difficult part on full dress salmon flies. It's what comes after the mounting that's the most difficult part. I start by waxing the thread about four inches down with good tacky wax. Once I have my wings where I want them with say four wraps of thread, I will back off a turn or two, holding the wings in place with my left hand always, and then trim the butts on an angle. Immediately, I'll wind the thread down to the eye, doing my best to bind things down. Then I start building a taper back up with thread wraps, again trying to smooth out and bind down. It's hard to avoid a "ledge" developing while you do all this, or avalanching the thread. It takes some practice. I never let go with the left hand.
22. I've wound the thread back up to the start of the wing in this shot.
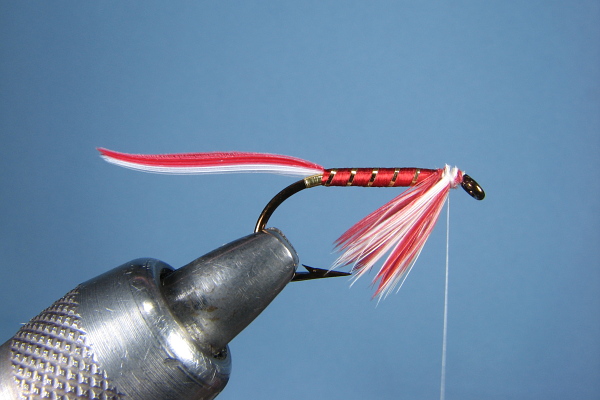
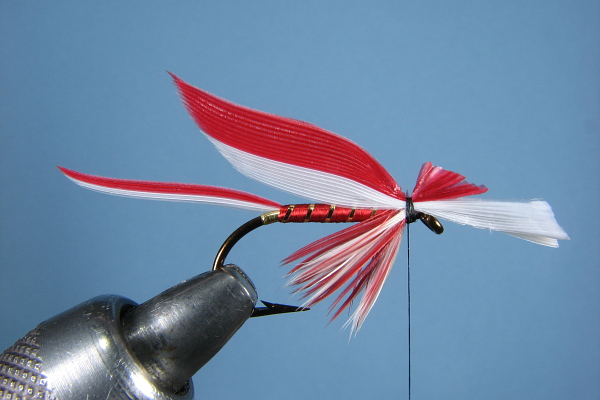
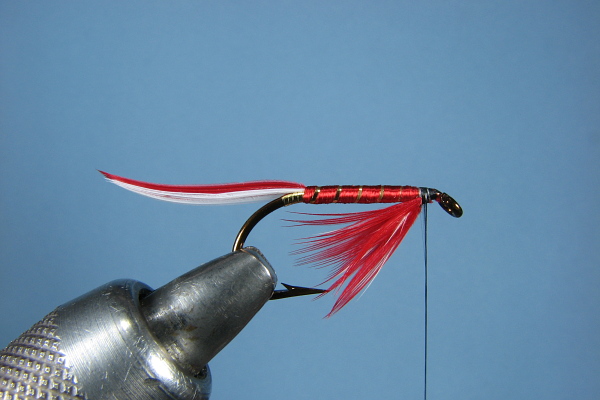
23. The head after the whip finish has been applied.
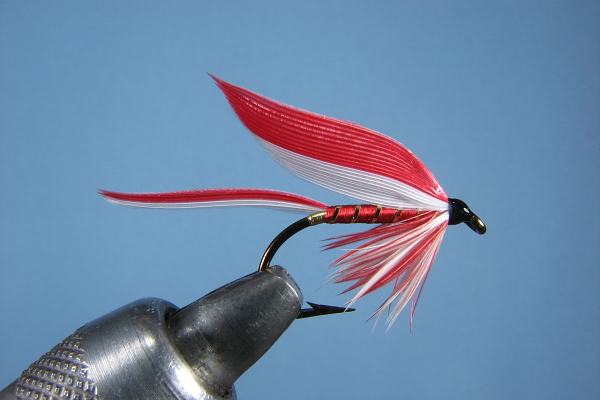
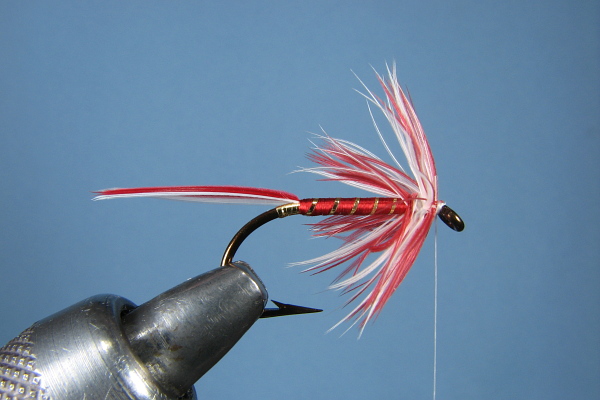
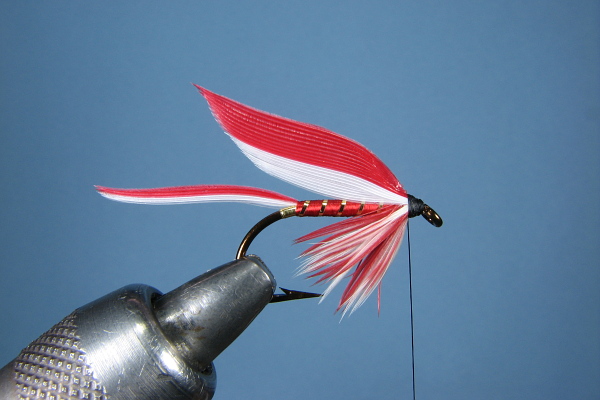
22. Finally the finished fly. I use a coat of Griff's thin first, and lots of it to really penetrate and fill. Then I do a coat of thick Sally Hanson's Hard As Nails to fill in gaps unless that's not needed. I'll do thin if I've already got a good head. By thick I mean an old bottle that's thickened up. Multiple thin coats are best. I'll do a final coat of Hard as Nails Extreme Wear black if I really want it to look extra great. In all cases, I've cut the brush that comes in the bottle of nail polish down to about half the width it was. Don Bastian uses Pro Lak from Canada for his final coat, and that's about the only black brushable lacquer available any more, other than nail polish. Wapsi no longer makes theirs, or so I'm told. The head, ideally, should be short and bullet shaped. Sometimes it's easier to get that shape than others. Crowding the eye helps.
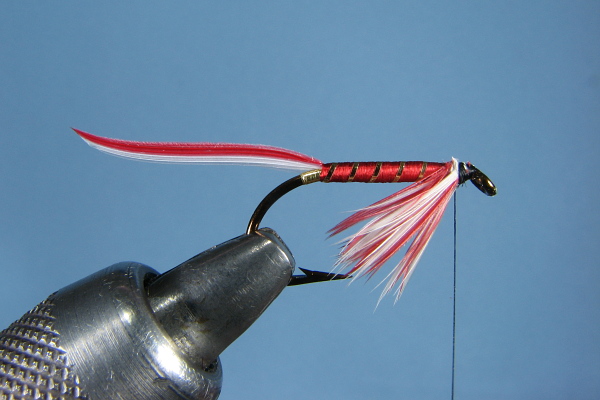
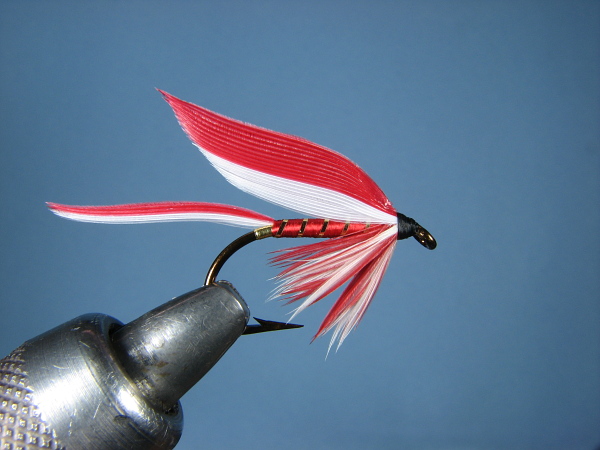
I've done a second fly here to show the beard hackle method, the one Don Bastian uses with his flies. I personally like to wind hackle, Ray Berman did, but Don's method is shown in J. Edson Leonard's "Flies", and was used on streamers as well as wets up in Maine. It has its roots in the full dress salmon flies from the 1800s, where it was used at times to make the throats.

On this feather I've pulled out two sections of schlappen, again a left and a right, that then stripped off. I did the same with a piece of white schlappen, then paired the two up as if they were wings that I was going to mount upside down on the bottom of the hook.
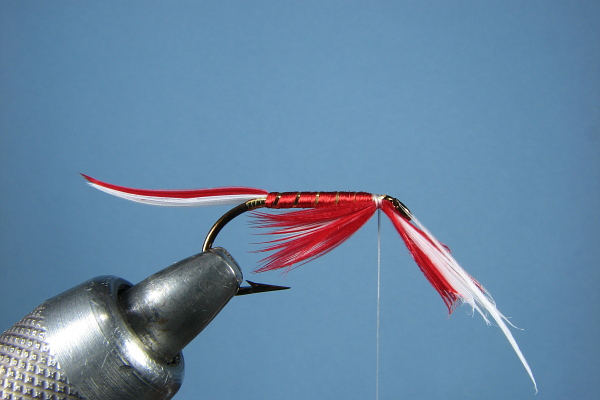
I put the red sections on the outside, because Henry P. Wells talks about winding the red over the white on his Parmachene Belle, and this fly is very similar. Since we're not winding, I've just put red the sections on the outside. I tie all four sections in at once, just as if they're wings.
Again I've switched the thread to black. You can switch to black before you attach hackle if it's dark in color.
Here's the second Ibis and White showing Don's method of attaching hackle. It has the advantage of promoting a smaller head, as well as laying flat for pictures.
Regardless of which hackling method you use, or whether you tie these tips together or tips out, in the words of Don Bastian "These flies are fun to tie". I couldn't agree more! Give one a try.
Hook: Mustad 3399 #6
Tip: Gold tinsel
Tail: Red and White
Ribbing: Gold tinsel
Body: Crimson floss
Hackle: Red and white mixed
Wing: Red and White
Background image from "Trout" by Bergman (1938)